Showing posts with label Repairs. Show all posts

Friday, July 22, 2011

Side of the Road Score

Chris and I happened upon this chair while walking the dogs recently. One of our neighbors had put it out at the curb for trash pickup. It looked pretty grimy, but I liked the shape.
So we hurried home, drove back to the chair, and popped it in the back of our pickup.

gross.

gross.

gross.


It was upholstered in vinyl, so I figured that it wouldn't hurt so see if I could get it cleaned up a bit. 
 The results were promising, so I kept going...

I started out using a vinyl and leather car upholstery cleaner. It worked well, but I got faster results when I tried laundry soap and water.

Before long, it looked like a brand new chair!
The seat cushion is clean, but discolored.  I think we can get by with covering it with a sheepskin throw from Ikea, but if you have another suggestion, please let me know!


Tuesday, January 11, 2011

Garage Before and After, It Doesn't Get More Exciting Than This

Yes, this subject is boring even to me and it is my garage. A friend of mine described spending money on repairs like these as the equivalent of buying a new bra. You spend a whole lot of money on something no one is going to notice.  Enough said.
We had to shore up the rafters because the sides of the garage were slowly spreading apart. This caused the garage door to fall off the track one night after I parked my car in the garage and attempted to shut the garage door. While we were at it, we also asked our contractor to fill in some cracks in the cement blocks, replace the roof and install a new garage door. These were all "must address" items noted our inspection report 


Here's what the garage door looked like before


And this is what it looks like now
You'll notice that the door is the wrong shade of brown and is lacking handles and other decorative elements. That's okay for now as we're planning to have the house and garage painted within the next couple of years anyway. Better to just do these things once. To me, a wrong shade of brown is much, much better than bright white which was our other option.
New roof
 Our contractor was able to raise the sagging ridge in the roof about 4 inches, but couldn't completely correct it. At least it won't be getting any worse thanks to our brand spanking new ceiling joists.


It is certainly nice to have this crossed off the list. Now we can concentrate on the fun projects. 

Friday, January 7, 2011

Our House Has a History

A neighbor of mine alerted me to the fact that our state offers a tax incentive to restore the exterior of historic homes. The credit equals 20% of the cost of the restoration work up to $2000 a year. Even better is that the $2000 credit rolls over each year it isn't used as long as you live in the house.  Not too shabby when we're looking to have a pricey new roof installed and have the exterior painted within the next few years.

Of course there are plenty of restrictions, for instance, outbuildings, replacement windows, and landscaping do not qualify.  We'll also need to apply for the credit and get the project approved by the state Historical Preservation & Heritage Commission prior to starting any work.  Additionally, we'll need to provide plenty of before and after photographs and, of course, all receipts.  Still, this is a small price to pay for a big reward.

One of the first hurdles is to determine eligibility for the credit.  This was actually simple, as I just emailed our address to someone at the state Historical Preservation & Heritage Commission and she confirmed it. Interestingly, she also provided this information:

RHODA AND WILLIAM PIMM HOUSE ca 1890: A small one-story, weatherboard
clad, mansard-roof dwelling with a turned-post front porch and a
bay window, both with a hipped roof. Pimm was a gold leaf manufacturer.
Garage before- 1918: A one-bay, two-car structure clad in weatherboard,
with a gable roof.

The interesting part is that previous owner had the preservation society in our city do some research on the history of the house and there are discrepancies in the information from the two sources. The city says that the original owner's name was Amelia not Rhoda, and that the house was built in 1886, not 1890.  The city says that the house was always a two-story structure, but the state says it was originally one-story.  

But both sources say that Pimm was a gold leaf manufacturer and I have to wonder if he had originally gold leafed the address number in the transom window above our front door (see it here).  Whatever the truth is, it is fascinating to think that about the life our house had before we moved in. 


Monday, January 3, 2011

Powder Room Update

This blog is a team effort, and Carrie has been carrying me for a bit... so here is my first ever blog post....
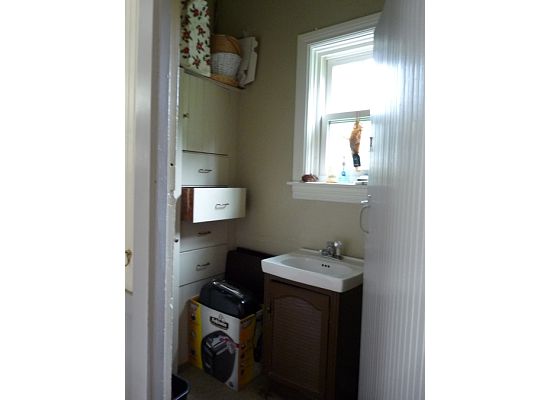
While Carrie was busting out the home office, I spent the week post Christmas working on our powder room. This is especially important because it is the only bathroom on the main floor of our house. It was also one of the rooms most in need of attention when we first moved in. This room had some carpet that may have raised a flag with the EPA. Greenish in nature (although not its original color), quite thin, and covering linoleum, it wasn't a pretty sight.
At first we thought we would take the easy route and keep the floor plan the same. In the photo below, you can see the not so pleasing built in closet area which we thought we'd just replace with an armoire. Upon considering the layout of the room, however, we realized that the tiny sink was really in an awkward spot-- the room's door opened directly on it.

Here is the current state of the room
This wall that had the built in cabinetry. I will frame a dummy wall to cover the stack to the right. We are reconfiguring the layout of the bathroom to put the vanity sink against this wall.


Plumbing for the old sink.

I had spoken with our plumber, Bobby a few days prior to removing the old plumbing, and he had told me that I could carefully rotate the old plumbing pipes in the basement out of their sockets. You are probably thinking what I was...why would you listen to the professional? Yep, online, I saw that some guys had used compression fittings to make the fix.  I'd used these before, and thought it was reasonable…  So, after measuring the pipes, I ran to Home Depot and got some compression fittings and plugs.  Back from HD, compression fitting ready…  


1, 2, 3….  Didn't fit.  
New curse words.  Water is still off.  Cut one of the pipes down, back in truck, back to HD.  Stare at the available compression fitting options and my pipe for quite some time, and thank the Home Depot Gods for this guy who rolls up after about 20 minutes and looks over my shoulder at what I am staring at with drool forming at the side of my mouth.  He looks at the pipe, I mention, "compression fitting, er ahh, pipe cut, water off, basement, er ah, wife home…."  and he says, "yeah, that fitting don't exist mon."  I think he was Jamaican.  I always liked Jamaicans, but now I love them. 
Panic began to set in.  I have an open pipe in the basement, and nothing to plug it with.  He says, you should just rotate out the pipe and screw in a stopper, I could not recall where, but I'd heard of this concept before.  I had the plugs already, so back in the truck, back home, a little mother'f'ering and monkey wrenching and the pipe was out.  Guess what?  The plugs I bought earlier in the day didn't fit.  Back to HD, new plugs, back home, teflon tape, and we were done.  Only three trips and $50 worth of supplies for a $10 fix.  But, the lesson was learned again, it is probably best to listen to what the expert would do rather than reinventing plumbing standards.  Thank God we are only 7 minutes from Home Depot.
This is the wall where the new toilet will be located.
This is the back of the existing door that we've decided to keep.
Old lath. I had pondered whether to keep it or not, but after consulting with my mentor, Tony the Contractor, it is staying and new sheetrock will be installed over it.
When I am finished framing the dummy wall and prepping the rest of the room for sheetrock, we'll call in the electrician to wire for sconces and an overhead light fixture. Next in line will be the plumber to plumb the new location of the vanity and toilet water supply.
When the rough plumbing is completed, we'll give Tony a call to come over to install and tape the sheetrock (I just did a closet, it looks ok, but its worth it to me to have someone else do it.) That will be an exciting day because it will mean that this dirty & dusty black hole in our house will finally start to look like a bathroom.
I will post more on this as I continue making progress.

Thursday, December 30, 2010

Day 2, Bye Bye Blue

It has been an exhausting day, but I got a lot accomplished since yesterday.
Started the day sanding the ceiling and walls to remove the excess joint compound until they were smooth, then I vacuumed up all the drywall dust. 
Progress at 3:15 pm: Sanding finished. Man, that took longer than I thought it would. Moving on to painting the ceiling. I decided to get a little crazy and paint the ceiling a lighter shade of the wall color. I really want the crown moulding stand out and I'm also hoping the darker color will help disguise some of the cracks in the ceiling.  
Progress at 4:53 pm: My favorite part, first stroke of the new paint color on the walls. We're using Behr Premium Plus Ultra which is paint and primer in one. HUGE timesaver.  
Progress at 5:30 pm: Chris installed crown moulding on the top of each bookcase. 
Progress at 8:30 pm: First coat done. I'm really pleased with the condition of the walls now. All my effort in skimcoating and sanding paid off.  
I'm on a mission to get the second coat completed before I go to bed tonight so that the walls will be dry enough for me to tape and paint the trim tomorrow. I can't wait until this project is finished!

Wednesday, December 29, 2010

Day 1, Skimcoat Done

Today marks the first day of our home office makeover. I started out by applying a thin layer of joint compound to the walls and ceiling to smooth out the pitted texture and cracks in the plaster. I also caulked the crown moulding and most of the bookcases.  
Prepping the room

Paint samples.
We're going with the second one from the right, Behr Washed Khaki (UL170-8) .

My helpers. 
That's me wearing my super sexy painting clothes.
Btw, the scaffolding has been one of our smartest purchase yet.

Progress at 10:30 am

Progress at 1:30 pm

Skimcoat finished 5:30 pm


 Phew. I'm wiped out and my shoulders are sore, but I got a lot done. Calling it a day.