I haven't had a chance to post on the bathroom work, so I'm stepping back a little bit.... first, Carrie mentioned the framing and expanding the casement ... the existing framing as shown below was ok, and the beadboard is ~3/4" thick-- so the walls are already very solid. What you see below required ripping the 2x4's down on my table saw, then notching with my jig saw. Overall, it went quite well, but it was time consuming. There are still pieces that need to be completed for the drywall.
A tool purchase that helped a lot and I have been very pleased with is the palm nailer, by Rigid, that you can see below... at around $70 at Home Depot, this thing is fantastic. It runs off my small PC pancake compressor, and drove everything without the expense of a framing nailer nor the PSI needs. Highly recommend it.... Also great for angles, toe nailing, etc. this tool pays for itself quickly. No problem to start a nail with a hammer and drive it home with this.
The next step has been the subfloor in the room. While the wood is in OK shape, it has been through multiple bathroom configurations... There are too many holes to salvage it. Below, you can see some of my patchwork-- Overall, the floor was > 2" thick with wood + subfloor, which is good... just needs a few patches.
After some effort and fitting the cement boards to size, it was time to add the thinset underneath the backer board. I bought an $8 drill attachment for stirring the thinset. Following the directions on the bag of mortar, it said to add water and then the thinset, but I think I should have done this gradually (I poured the whole bag in.)
Trying to mix the thinset strained the sh*t out of my favorite Rigid Power Drill (3/8".) It is corded and there was smoke and some nasty fumes coming out from it-- Carrie complained of a headache for the rest of the day.... So I used the stirring attachment without power (think churning butter) but it wasn't perfect-- I didn't like the consistency of the thinset, it was a bit thick, but I think it was ok.
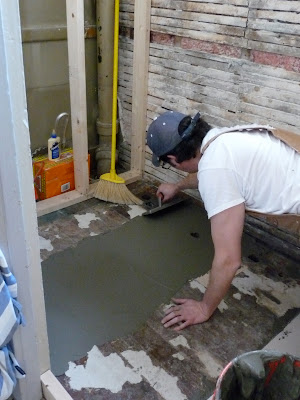
You can see below my scratch coat on the left, I used a drywall knife to lay this down. On the right I am using my trowel... the ridge to the right of my hand was knocked down. Farther to my right, you can see a 2x4 I cut down to prevent thinset from seeping and drying where the threshold will go inside the casement.
First layer of board down here... a few screws in, but not the full allotment. I wanted to lay the thinset efficiently.
Below I am on my second board ... improving technique as I go, this is a nicer scratch coat. If you are wondering about the white spots, that is linoleum adhesive I couldn't get up easily... by easily, I mean without the use of a power tool or pliers and a blowtorch. Everything I read online said to not bother with it if it is secured well to the floor.
This is a shot of my putting in the backer board screws every 8 inches.... I'm sure guys get used to it, but this work is really hard-- hunched over, time sensitive... I have a tremendous amount of respect for guys that do this every day. I used my Hitachi impact driver to do the floor screws, it worked great, although I did have to run to the basement to switch batteries... no biggie.
With all three sections in, I placed some mesh tape on the seams and leveled them a bit.
Finished subfloor, still drying. Screws have been placed every 8".
It is really important to me to give back a little bit.... This is me teaching Georgia how to cut backer board. Once she realized fud wasn't involved she did pretty gud.


